📬Connect an email inbox
Connect Gmail, Outlook, any IMAP mailbox or a forwarding address so retailer order emails become orders and keep them up to date.
- Written for
- Anyone who gets order, shipping or delivery emails from retailers
- Applies to
- All plans
- Deprecated
- + Deprecated
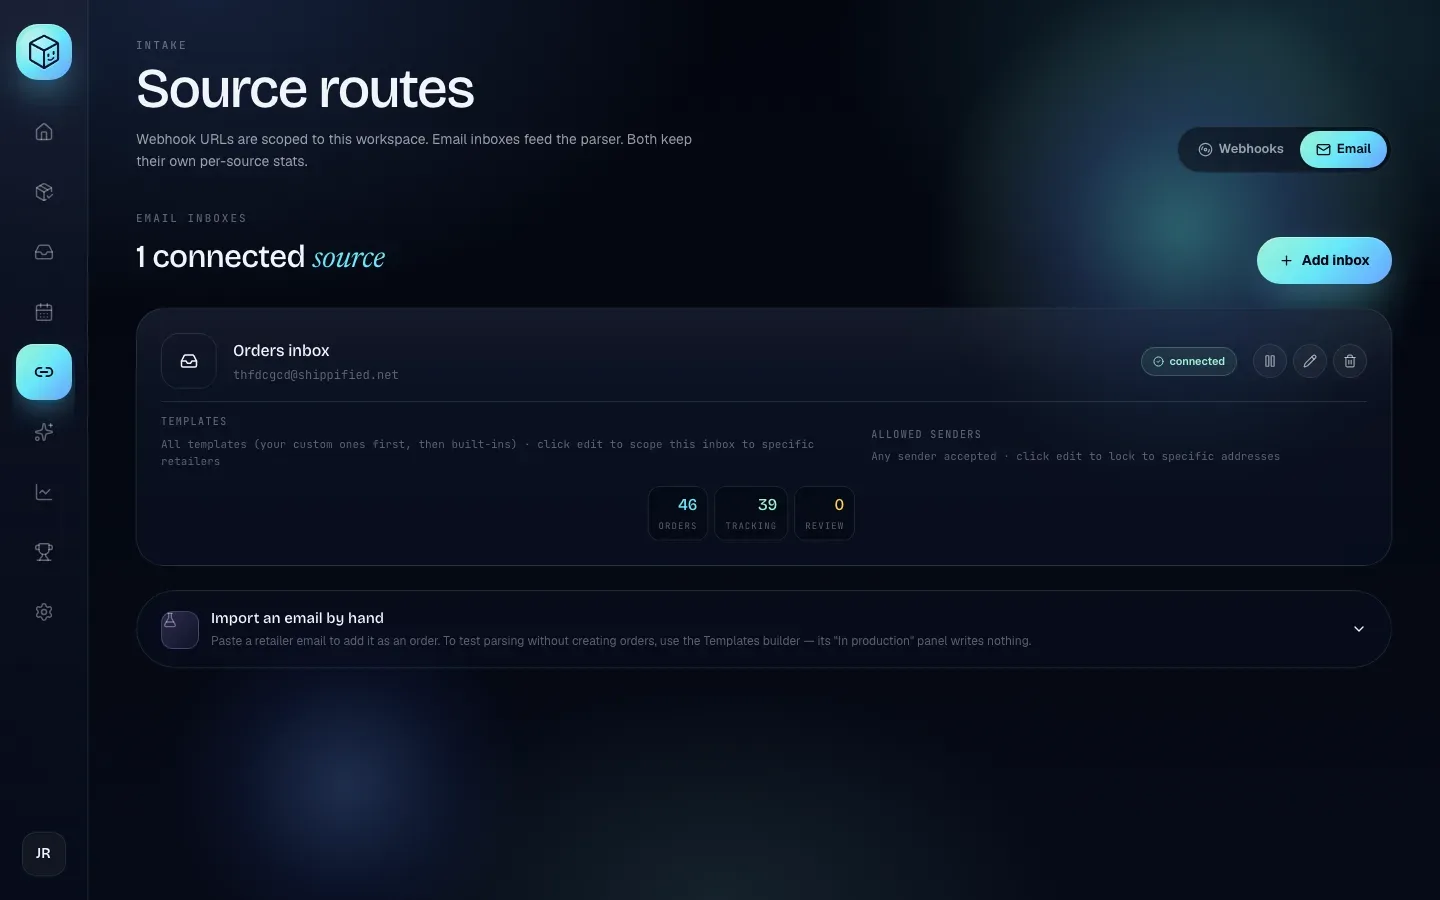
Retailers email you when you place an order, when it ships, when it's out for delivery and when it arrives. Connect the inbox that receives those emails and Shippified turns them into orders, then updates each order as the later emails come in. You set this up on Links → Email. Each connected inbox is called a source.
This guide covers the four ways to connect, every field on the form, what the source card shows, which emails Shippified recognises, how to import a single email by hand, and how to fix common problems.
Before you start
You need a Shippified account. If you're setting up for the first time, the setup wizard shows the same form on its Inbox step. You can also skip that step and come back here later.
Decide which connection method suits you (see the next section). Have the mailbox's sign-in details to hand.
Built-in support covers Target, Walmart, Amazon and Best Buy. Mail from other stores needs a custom template. See Custom templates.
Choose a connection method
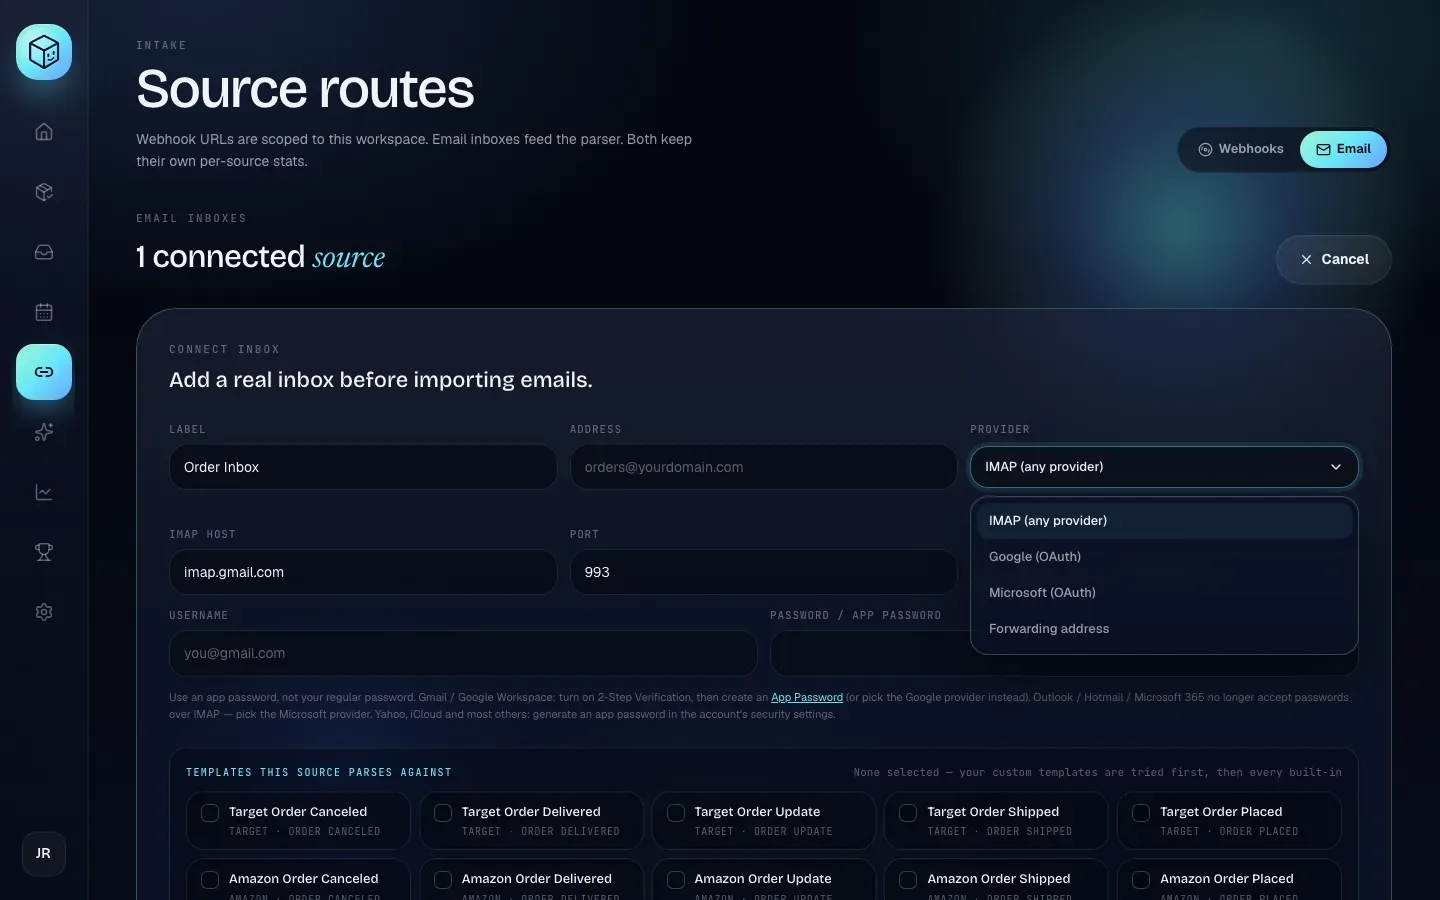
Open Links in the sidebar, choose the Email tab, and click Add inbox. The Provider menu has four options:
Provider | Best for | What Shippified needs | How mail arrives |
|---|---|---|---|
Google (OAuth) | Gmail and Google Workspace | Permission from Google's own sign-in screen. Read-only. No password. | Shippified checks the mailbox about once a minute |
Microsoft (OAuth) | Outlook.com, Hotmail, Live and Microsoft 365 | Permission from Microsoft's own sign-in screen. No password. | Shippified checks the Inbox folder about once a minute |
IMAP (any provider) | Yahoo, iCloud, your own domain, or any other provider | Server name, username and a password or app password | Shippified checks the INBOX folder about once a minute |
Forwarding address | Anyone who'd rather not give Shippified mailbox access | Nothing. You forward mail to an address Shippified makes for you. | Arrives within seconds of being forwarded |
OAuth is the "Sign in with Google / Microsoft" style of permission: you approve access on the provider's own page, and Shippified never sees your password. IMAP is the standard way mail apps read a mailbox.
If you use Gmail, choose Google (OAuth). If you use Outlook.com or Microsoft 365, choose Microsoft (OAuth). They need no passwords or app passwords.
Connect your inbox
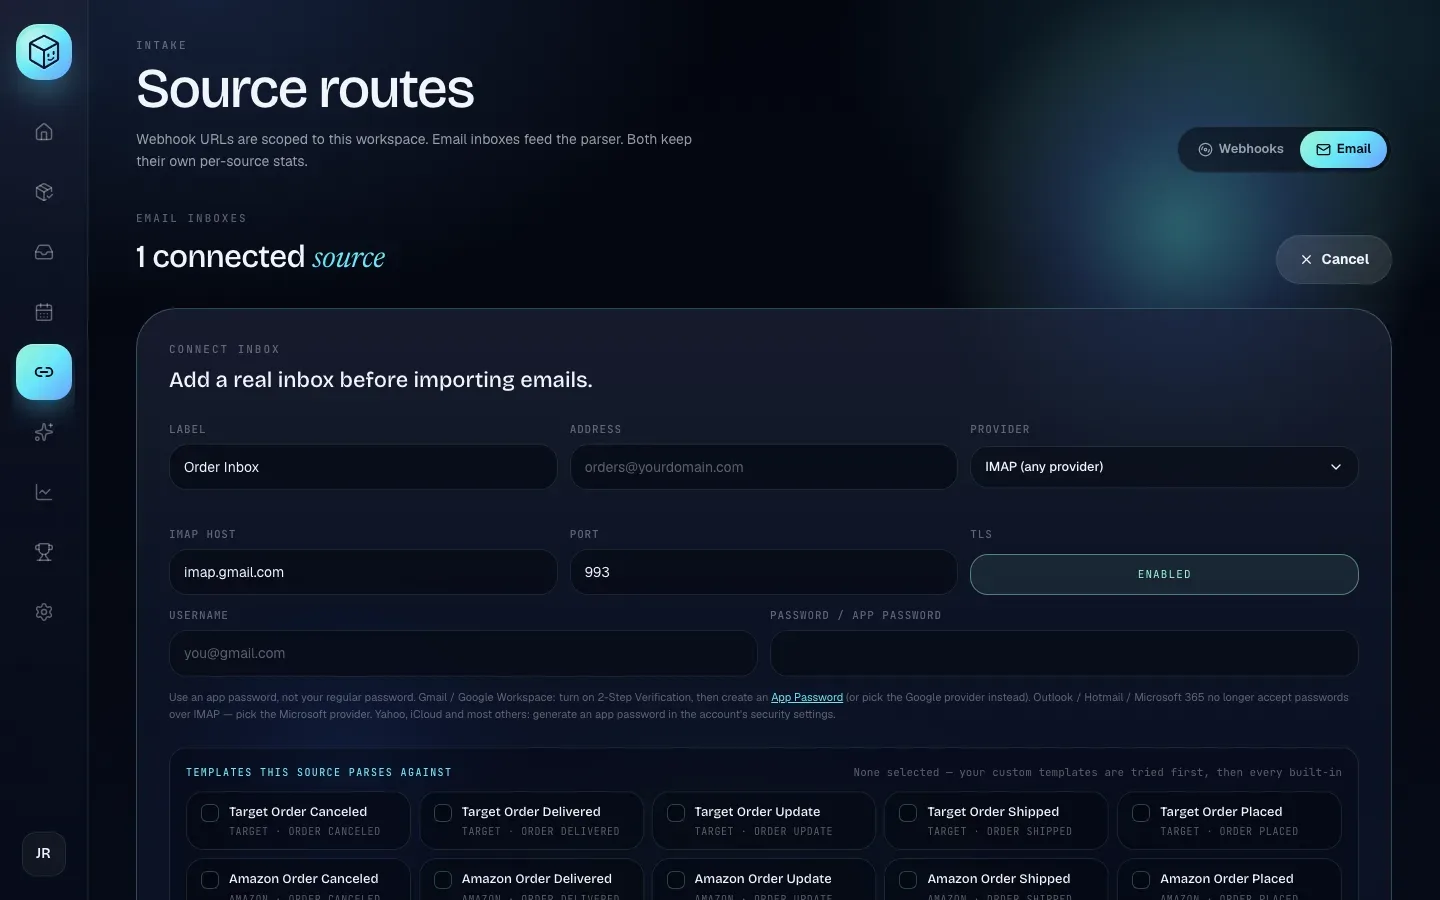
The form starts with the same three fields for every provider:
Label: a name for this source, shown on its card and in the Inbox. Starts as "Order Inbox". Example:
Main Gmail. Left blank, it's saved as "Order Inbox".Address: the mailbox's email address, used for display. For Google and Microsoft it's replaced with the account you connect. For a forwarding source it's replaced with your new inbound address. It can be left blank; the card then says no address set — click edit to add one.
Provider: how Shippified reaches the mail.
Then follow the tab for your provider.
- Gmail (Google sign-in)
- Outlook / Microsoft 365
- IMAP (any provider)
- Forwarding address
Shippified asks Google for read-only Gmail access. It can read messages. It can't send, delete or change anything.
- Save the source
Click Add inbox, enter a Label, set Provider to Google (OAuth) and click Connect inbox. The new card appears with the amber status needs auth and the line "Not connected yet — sign in to Google before this inbox can sync."
- Sign in with Google
Click Connect Google on the card. Google's sign-in opens in a new browser tab, and the card notes "Finish signing in to Google in the new tab, then come back here." Choose your account and approve access.
- Close the tab
The tab shows Connected and
Connected you@gmail.com. You can close this tab.Close it and go back to Shippified. - Check the card
Reload Links → Email if the card hasn't changed. It now shows connected and your Gmail address. The first check reads your 25 most recent messages.
The Connect Google account button inside the form only works on a saved source. If you click it on the new-source form, Shippified shows Save the source first, then click Connect Google on the saved card. Once the source is saved, you can sign in from the card's Connect Google button or from Connect Google account in its edit form.
Google reads across your whole mailbox, not just one folder, so labels and filters that skip the Inbox don't hide order mail. You can remove Shippified's access at any time from the security settings of your Google account.
This works for personal Microsoft accounts (Outlook.com, Hotmail, Live) and for Microsoft 365 work or school accounts.
- Save the source
Click Add inbox, enter a Label, set Provider to Microsoft (OAuth) and click Connect inbox. The card appears with the status needs auth and the line "Not connected yet — sign in to Microsoft before this inbox can sync."
- Start the sign-in
Click Connect Microsoft on the card. Microsoft's sign-in opens in a new tab.
- Approve access
Sign in and approve the permissions Shippified asks for: read your mail, read your basic profile, and keep access (so it can check without you signed in).
- Close the tab
The tab shows Connected with your address. Close it, go back to Shippified and reload Links → Email. The card shows connected. The first check reads Inbox mail from the last 3 days.
Shippified reads the Inbox folder only. If a rule moves retailer mail into another folder, Shippified won't see it.
Some workplaces only let an administrator approve apps. If Microsoft shows Need admin approval, ask your IT admin, or use a forwarding address instead.
Use IMAP for any provider without a sign-in button above: Yahoo, iCloud, AOL, Zoho, Fastmail, your web host, and so on.
- Pick IMAP
Click Add inbox and leave Provider on IMAP (any provider) (it's the default).
- Enter the server details
Fill in IMAP host, Port, TLS, Username and Password / app password. Each is explained in the table below. As the hint under the fields says, use an app password, not your regular password; see "Create an app password" below. For Outlook, Hotmail and Microsoft 365, don't use IMAP at all: pick Microsoft (OAuth).
- Connect
Click Connect inbox. IMAP sources show connected straight away, before Shippified has tried to sign in.
- Test it
On the new card, click Sync now. You should see a result such as
Up to date — no new order emails.or2 order emails imported.If the sign-in is rejected, the status changes to auth failed. The first check reads the 25 newest messages in your INBOX.
Field | What to enter | If left blank or wrong |
|---|---|---|
IMAP host | Your provider's IMAP server. Starts as | Required: |
Port |
| Anything that isn't a number becomes |
TLS | Leave Enabled (encrypted connection). Click it to switch to Disabled only if your provider says so. | |
Username | Usually your full email address. | If blank, the Address is used. If both are blank: |
Password / app password | An app password created for Shippified. | Required when adding: |
Common IMAP servers:
Provider | IMAP host | Port | Username |
|---|---|---|---|
Gmail |
| 993 | Your full Gmail address |
Yahoo Mail |
| 993 | Your full Yahoo address |
iCloud Mail |
| 993 | Your iCloud Mail address (if that fails, only the part before the @) |
Other | See your provider's help pages for "IMAP settings" | Usually 993 | Usually your full address |
Your password is encrypted before it's stored and is never shown again. When you edit the source later, the password field reads Password / app password (leave blank to keep): leave it empty to keep the saved one.
Shippified reads only the INBOX folder over IMAP. If a filter moves retailer mail into another folder before Shippified sees it, it won't be picked up.
Create an app password. An app password is a separate password for one app. You can revoke it without changing your main password.
Gmail
Turn on 2-Step Verification in your Google account's Security settings. App passwords only exist once it's on.
Go to
myaccount.google.com/apppasswords(the App Password link under the IMAP fields opens it).Type a name such as
Shippifiedand click Create.Copy the 16-character password Google shows. It's shown only once.
Paste it into Password / app password. Use
imap.gmail.com, port993, and your full Gmail address as the username.
If Google says app passwords aren't available, 2-Step Verification is off, or your Workspace admin has turned them off. Google (OAuth) avoids app passwords entirely.
Yahoo Mail
Sign in to Yahoo and open Account security in your account settings.
Choose Generate app password (sometimes listed as App passwords).
Enter a name such as
Shippifiedand generate it.Copy the password and paste it into Password / app password. Use
imap.mail.yahoo.com, port993, and your full Yahoo address.
iCloud Mail
Two-factor authentication must be on for your Apple Account.
Sign in at
account.apple.comand open Sign-In and Security, then App-Specific Passwords.Click to generate a new password, name it
Shippified, and copy it.Paste it into Password / app password. Use
imap.mail.me.comand port993.
Outlook.com, Hotmail and Microsoft 365
Microsoft has switched off password sign-in for IMAP on Outlook.com and on most Microsoft 365 mailboxes, so app passwords generally no longer work there. Use Microsoft (OAuth) instead. It needs no password.
With a forwarding source, Shippified never signs in to your mailbox. You forward the retailer emails you want tracked to a unique address, and Shippified reads each one as it arrives.
- Create the source
Click Add inbox, set Provider to Forwarding address and click Connect inbox. Before you save, the form explains that Shippified will create an address like
your-slug@shippified.net. - Copy your inbound address
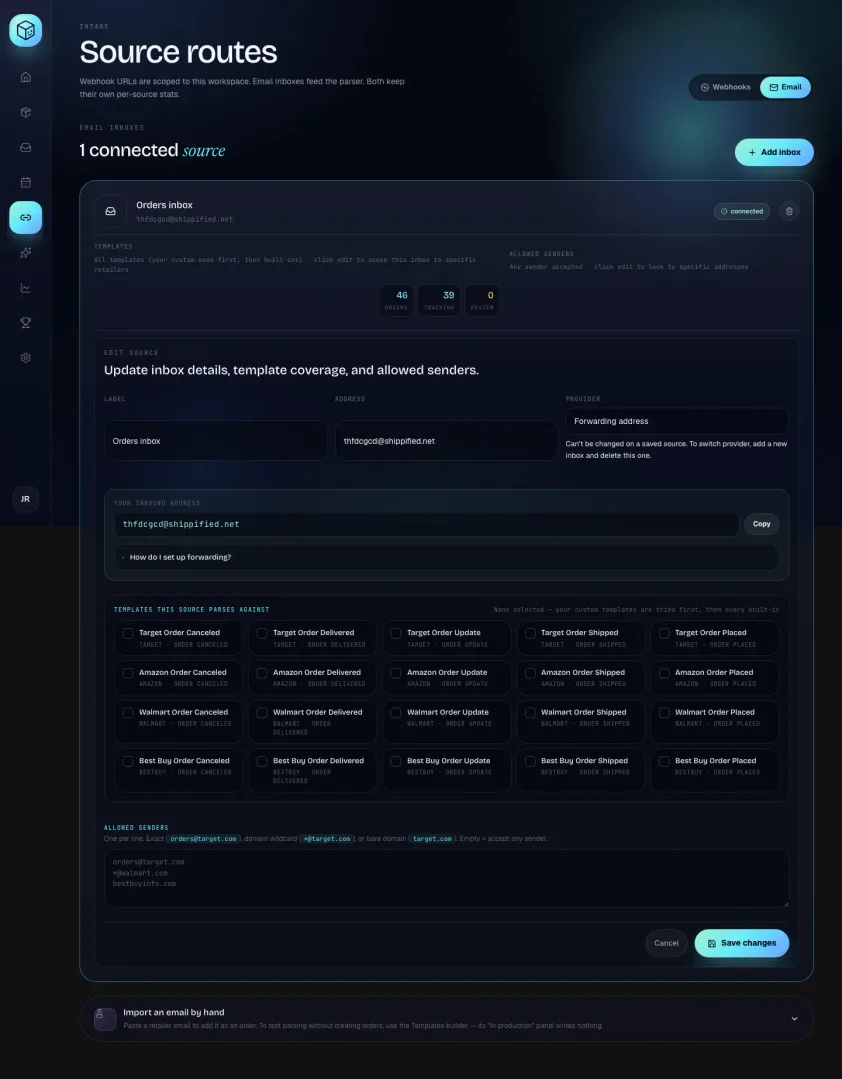
The new card shows your address, for example
w5v7bz3z@shippified.net. To copy it, click the pencil icon (Edit source), find Your inbound address and click Copy. The button changes to Copied. - Forward your order mail to it
Set up forwarding in your email account (steps below). Forwarding sources are connected as soon as they're created. There's nothing to check or sync.
The first part of the address is random and hard to guess, and it belongs to this one source. Treat it like a password: anyone who knows it can send mail into your workspace. Your Allowed senders list (below) limits what they could do.
The How do I set up forwarding? panel under the address has short reminders for common providers. In more detail:
Gmail: forward only order mail
In Gmail, click the gear icon, then See all settings.
Open the Forwarding and POP/IMAP tab and click Add a forwarding address.
Paste your inbound address, click Next, then Proceed and OK. Gmail sends a confirmation email to that address.
Go back to Links → Email in Shippified and reload. The card shows Gmail is asking to confirm forwarding with the code (see "Confirm Gmail forwarding" below). Confirm it.
Back in Gmail, create a filter: click the search options icon in the search bar, type the retailers' sender addresses in From, for example
orders@oe.target.com OR help@walmart.com, and click Create filter.Tick Forward it to, choose your inbound address, and click Create filter.
You can instead choose Forward a copy of incoming mail to on the Forwarding and POP/IMAP tab to send everything. Shippified ignores mail that isn't about an order and doesn't keep it, but forwarding everything shares more of your mail than needed.
Outlook.com and Microsoft 365
Forward everything: open Settings, then Mail, then Forwarding. Turn on Enable forwarding, paste your inbound address, and save.
Forward only order mail: open Settings, then Mail, then Rules, and add a new rule. Set the condition to From with the retailers' addresses, set the action to Forward to, and enter your inbound address.
Work accounts may block automatic forwarding to outside addresses. If forwarded mail never arrives, ask your admin, or use Microsoft (OAuth).
iCloud Mail
On iCloud.com, open Mail, click the settings (gear) icon, then Rules. Add a rule that matches the retailer's sender address and forwards to your inbound address.
Your own domain (Cloudflare Email Routing, ImprovMX and similar)
Add a forwarding entry that sends an address on your domain, such as orders@yourdomain.com, to your inbound address. Then use orders@yourdomain.com as the email on your retailer accounts.
Confirm Gmail forwarding. Gmail won't forward to a new address until you confirm it, and it sends the confirmation to that address. Because the address is your Shippified inbound address, Shippified catches the confirmation for you. The card shows Gmail is asking to confirm forwarding, Requested by the Gmail account that asked, and two buttons:
The code button: click it to copy the code, then enter it in Gmail under Settings → Forwarding and POP/IMAP and click Verify.
Open confirmation link: opens Google's confirmation page directly.
The box goes away by itself when the first ordinary email reaches the address, since that means forwarding is working. To hide it sooner, click Dismiss. The confirmation email is never turned into an order.
Manual forwards work too. Automatic forwarding keeps the retailer as the sender. When you forward a message by hand from Gmail, Apple Mail or Outlook, the original sender and subject are quoted in the body, and Shippified reads the order from them. For Allowed senders, the quoted retailer only counts when you forwarded the message from your own address (see Allowed senders).
Bounced mail. Mail sent to your inbound address is refused and bounced back to the mailbox that forwarded it, with a reason starting Shippified:, when:
the address doesn't belong to any source (for example, you deleted the source)
your plan's monthly order limit has been reached
the message is too large (over about 2 MB; order emails are far smaller)
Mail that isn't about an order, mail from a sender that isn't allowed, and mail that arrives while the source is paused is accepted quietly and not bounced. None of it becomes an order.
Set templates and allowed senders
Two optional settings on every source control how it reads mail. Both are on the add form and the edit form.
Templates this source parses against
A template is the set of rules that recognises one kind of email (for example "Target Order Shipped") and pulls out its details. Each chip is one template: the built-in ones for each retailer and status, plus any custom email templates you've built.
None selected (the default): the heading reads None selected — your custom templates are tried first, then every built-in. This is the right choice for most people.
One or more selected: click chips to select them. The heading changes to N selected · only these are tried, top→bottom; first match wins, and each chip shows its priority number in the order you clicked. Only those templates are tried, custom or built-in. Click a selected chip again to remove it.
Selecting templates doesn't block other mail. When none of the selected templates matches, Shippified still applies its general rules for order mail (see "Which emails become orders"). To stop mail from a sender reaching the source at all, use Allowed senders.
A custom template only matches email if it has at least one match rule.
Allowed senders
A list of sender addresses, one per line (commas also work). If it's empty, any sender is accepted. Each line can be:
Entry | Matches |
|---|---|
| Exactly that address |
| Any address at |
| The same as |
Matching ignores upper and lower case. The check uses the email's real sender. For a message forwarded by hand, the retailer quoted inside it ("Forwarded message … From:") counts only when the forward came from the account owner's own address: your Shippified account email, the source's Address, its IMAP Username, or the connected Gmail or Microsoft mailbox. Then you list only retailer addresses, never your own. A message forwarded in by anyone else is judged by that person's own address, because a quoted "From:" line is just text anyone can type.
Email from a sender that isn't allowed never becomes an order. It's listed in the Inbox as Rejected, with the sender that was checked, so a missing entry is easy to spot. The list applies to every way mail reaches the source, including emails you import by hand.
Use bare domains (target.com, walmart.com, amazon.com, bestbuy.com) rather than exact addresses. Retailers send from several addresses and subdomains, and a domain entry covers all of them.
Read the source card
Each source has a card on Links → Email. The heading above the cards counts the sources whose status is connected (1 connected source), followed by "· N paused" and "· N not connected" when there are any.
Part of the card | What it shows |
|---|---|
Label and address | The Label you chose, and the mailbox or inbound address |
Status tag | connected, paused, needs auth or auth failed (see the table below) |
Templates | The templates you selected, or All templates (your custom ones first, then built-ins) · click edit to scope this inbox to specific retailers |
Allowed senders | Your entries, or Any sender accepted · click edit to lock to specific addresses |
Orders | Orders that came from this source |
Tracking | Of those, orders that are shipped or delivered |
Review | Of those, orders with the Issue status that need a look |
Sync line (Google, Microsoft, IMAP only) |
|
Sync now (Google, Microsoft, IMAP only) | Checks the mailbox immediately. Shows Syncing…, then a result such as |
The icons in the top-right corner:
Pause syncing (pause icon) or, on a paused source, Resume syncing (play icon): see Pause a source. Hidden until a Google or Microsoft source is signed in.
Rebuild orders from mailbox (clock icon, Google, Microsoft and IMAP only, hidden until a Google or Microsoft source is signed in, and while the source is paused): re-reads older mail. See Rebuild orders from a mailbox.
Edit source (pencil): opens the form inside the card. Change what you need and click Save changes, or Cancel. Provider is shown but can't be changed: "Can't be changed on a saved source. To switch provider, add a new inbox and delete this one."
Delete source (bin): asks Delete this source? with the note Past orders parsed from it stay in your workspace. The inbox will stop ingesting new emails. Click Delete source to confirm or Keep it to back out.
To switch connection methods, add a new source, check that it works, then delete the old one.
Deleting a forwarding source retires its inbound address for good. Mail forwarded to it afterwards bounces, and a new source gets a different address, so update your forwarding rules. Deleting a Google or Microsoft source doesn't remove the permission you granted; remove it from your Google or Microsoft account's security settings.
Source statuses
Status | Meaning | What to do |
|---|---|---|
connected | Working. Checked about once a minute (forwarding sources receive mail as it arrives). | Nothing |
paused | You paused it. Nothing from it becomes an order. | Click Resume syncing when you want it back |
needs auth | A Google or Microsoft source that hasn't been connected yet | Click Connect Google or Connect Microsoft on the card |
auth failed | The provider rejected Shippified's sign-in, so checking has stopped | See "Troubleshooting" |
Pause a source
Pausing stops a source without deleting it, for example while you clean up a mailbox or stop using a forwarding rule for a while. Any source can be paused once it's connected, including forwarding addresses.
To pause, click the pause icon (Pause syncing) in the card's top-right corner. The tag changes to paused and the heading counts it under "· N paused".
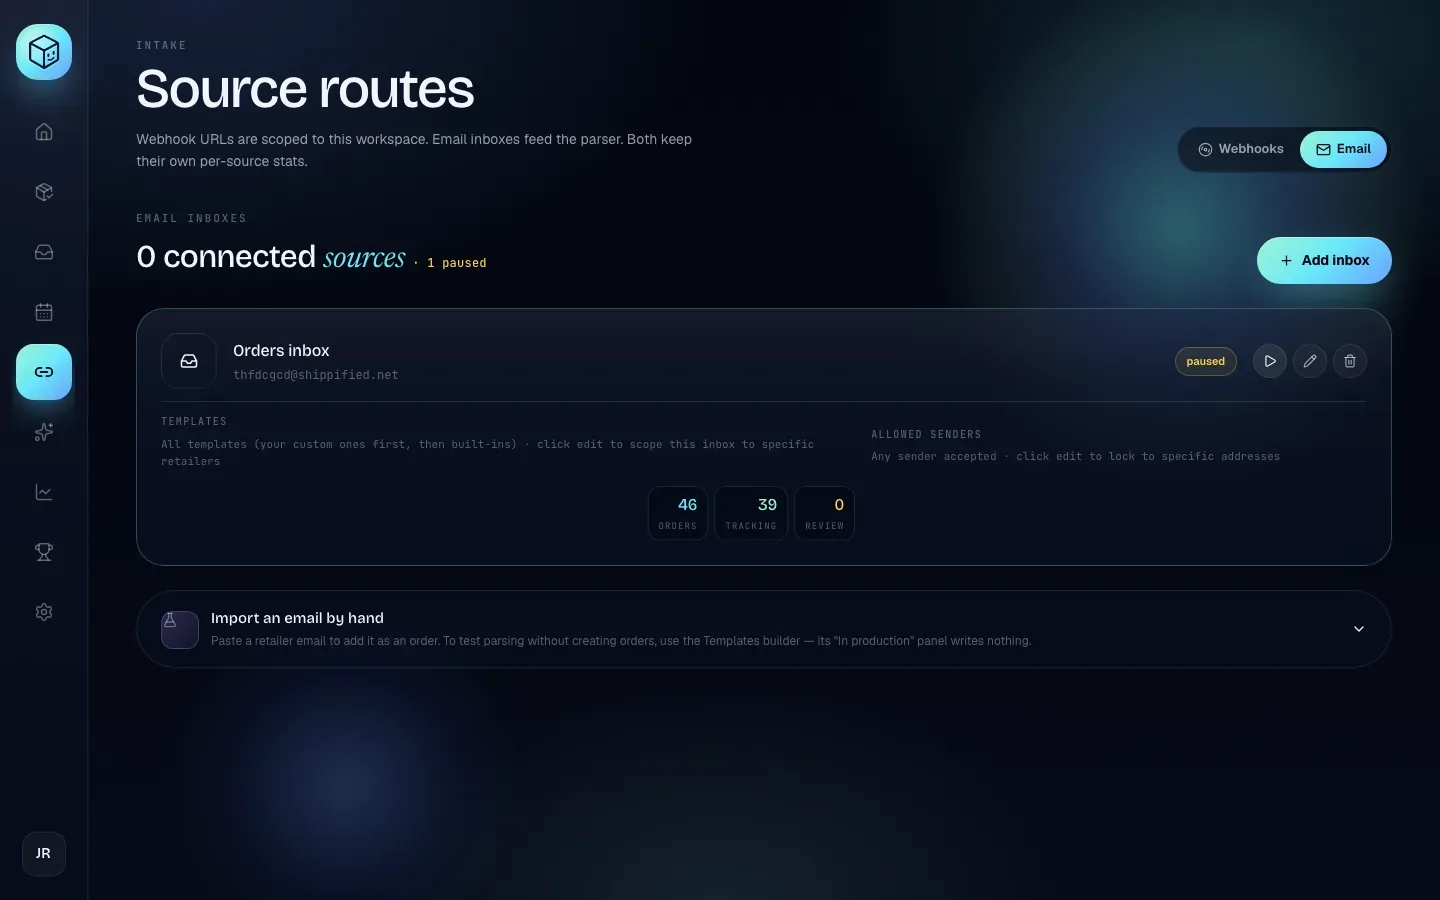
While a source is paused:
Google, Microsoft and IMAP: Shippified stops checking the mailbox. The sync line reads
Paused — Shippified isn't checking this inbox. Resume to pick up where it left off., Sync now is replaced by Resume, and Rebuild orders from mailbox is hidden.Forwarding address: the address keeps accepting mail, so nothing bounces, but everything that arrives is dropped. It isn't turned into an order, and it isn't kept to read later.
To resume, click the play icon (Resume syncing), or Resume on the sync line. The source goes back to connected. A mailbox source picks up where it left off, so mail that arrived while it was paused is read on the next check (up to 50 messages per check). Mail sent to a forwarding address while it was paused isn't recovered; forward it again or import it by hand.
How checking works
Microsoft | IMAP | ||
|---|---|---|---|
What's read | Your whole mailbox | The Inbox folder | The INBOX folder |
First check after connecting | Your 25 most recent messages | Inbox mail from the last 3 days | The 25 newest messages |
Later checks | Only new mail since the last check | Only new mail | Only new mail |
Most messages per check | 50 (any backlog carries over to the next check) | 50 | 50 |
Each order is dated with the email's own date, not the time Shippified read it, so mail read late still lands on the right day. To bring in mail from before you connected, use Rebuild orders from a mailbox.
Which emails become orders
A typical inbox has far more marketing and account mail than order mail. Shippified creates or updates an order only when an email is clearly about a purchase. Everything else is ignored: it isn't turned into an order, isn't kept, and isn't listed in the Inbox.
Supported retailers. Built-in templates cover these stores, recognised by the sender's domain (including subdomains such as oe.target.com):
Retailer | Sender domain |
|---|---|
Target |
|
Walmart |
|
Amazon |
|
Best Buy |
|
Recognised emails. For each retailer there's a template per status, matched on the subject line. Shippified checks them in this order, so a subject that mentions both cancelling and shipping counts as a cancellation:
Template | Subjects it recognises (examples) | Order status it leads to |
|---|---|---|
Order Canceled | "canceled", "cancelled", "cancellation", "had to cancel", "couldn't fulfill" | Canceled (never replaces Shipped or Delivered) |
Order Delivered | "was delivered", "has been delivered", subjects starting "Delivered", "picked up", "has arrived" | Delivered |
Order Update | "out for delivery", "arriving today/tomorrow/soon/late", "about to ship", "ready for pickup", "pickup reminder", "delayed", "running late", "delivery update", "new delivery date", "release day", "preorder payment", "update your payment" | Ordered, or Shipped if it carries a tracking number (a status never moves backwards) |
Order Shipped | "shipped", "shipping confirmation", "on its way", "has left our", "is coming" (Amazon: subjects starting "Shipped", "has shipped", "shipment has been sent") | Shipped |
Order Placed | "thanks for your order", "thanks for shopping", "thank you for your purchase", "here's your order", "order confirmation/confirmed/received/placed", "we've received your order", subjects starting "Ordered" | Ordered |
General rules. If no template matches, an email still becomes an order when all of these are true: it's from a supported retailer's domain, it contains an order number, and its subject (or the start of its body) describes a placed, shipped, delivered, updated or canceled order.
Emails about the same order (confirmation, shipping, delivery) are combined into one order by order number. See Order lifecycle.
Always ignored:
Marketing and newsletters, such as "New drops this week!", because they don't read like an order event.
Sign-in codes, password resets and account notices: no order number, no order event.
Amazon seller notices. Amazon emails buyers and sellers from the same domain, so subjects about sellers, listings, brand approval, feedback removal, payouts and disbursements, and replies starting "Re:", are always skipped.
Mail from stores Shippified doesn't recognise. To track another store, build a custom email template on the Templates page.
An email Shippified already has. Every email is recorded by its unique message ID, so the same email read twice (a re-check, a rebuild, or through two sources) never makes a second order.
An email that belongs to an order you deleted by hand is also left out when it's read again (a re-check, a rebuild, or the same forward arriving twice), so a deleted order stays deleted. The Inbox lists it as Skipped. A new email about that order, such as a later shipping notice, still creates an order, and so does importing the email by hand.
Import an email by hand
At the bottom of Links → Email, Import an email by hand turns one pasted email into an order. Use it for a single email that arrived before you connected, or one that wasn't forwarded.
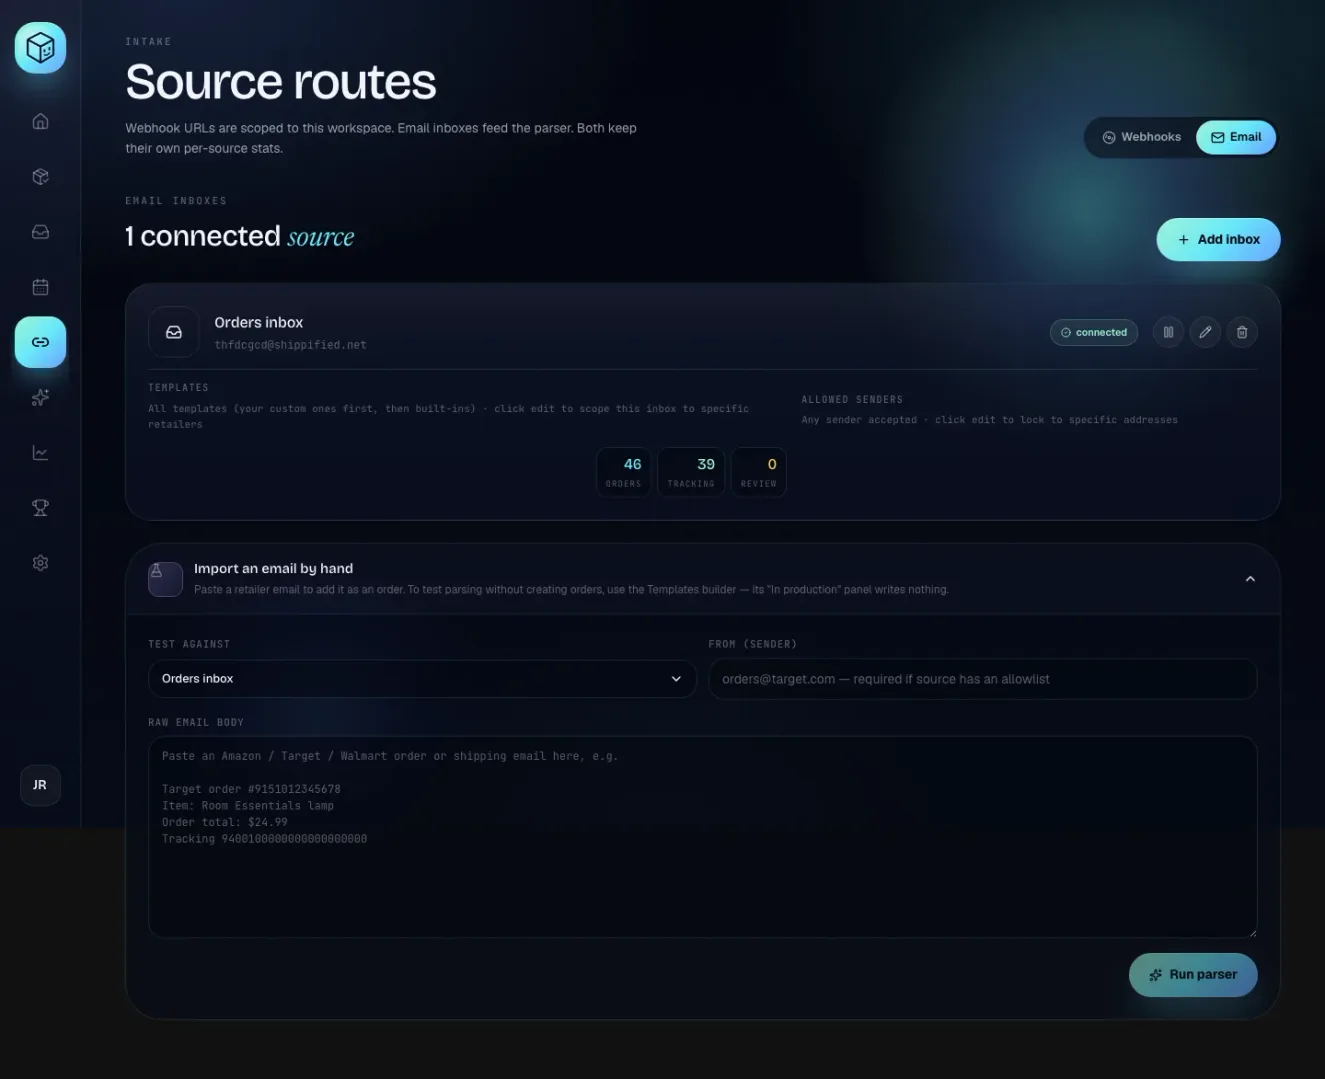
- Open the panel
Click Import an email by hand to expand it. If you have no sources yet, it says
Connect an inbox above before testing the parser. - Choose a source
Under Test against, pick the source this email belongs to. Its templates and Allowed senders apply.
- Paste the email
Paste the email into Raw email body (it starts empty, with an example in grey). The full original with its headers works best: in Gmail use Show original, in Outlook View message source. Pasted HTML or plain text works too.
- Add the sender if needed
If what you pasted has no
From:line, type the retailer's address in From (sender), for exampleorders@target.com. It's required when the source has Allowed senders set. - Run it
Click Run parser (it can't be clicked while Raw email body is empty). The button shows Parsing…, then
Imported — it's in your orders now.
This creates a real order. To see how an email would be read without creating anything, paste it as the sample in the template builder on the Templates page: its In production panel writes nothing. See Custom templates.
Emails you import by hand are never ignored. If Shippified can't tell the store or item, the order gets the Issue status so you can fill it in. Importing the same email twice doesn't create a second order.
Troubleshooting
The card says "auth failed" (Google or Microsoft)
Access was removed from your Google or Microsoft account, it expired, or (for Google) you changed your account password, which ends mail access for connected apps. Click Edit source, then Connect Google account (or Connect Microsoft account) and approve again. The source goes back to connected. Emails already imported are skipped automatically.
The card says "auth failed" (IMAP)
The mail server rejected the username or password. Common causes:
Your provider needs an app password and was given your normal password.
2-Step Verification was turned on after you connected, so your plain password stopped working.
The app password was revoked, or your password changed.
It's an Outlook.com or Microsoft 365 mailbox, which no longer accepts IMAP passwords. Use Microsoft (OAuth).
To fix it, click Edit source, enter the right username or a new app password, and click Save changes. Saving puts the source back to connected and clears the error, and checking carries on where it stopped. Click Sync now to confirm. There's no need to delete and re-add the source. While the status is auth failed, Sync now shows Source paused (auth_failed).
The Google or Microsoft tab says "Connection failed"
Read the message on the page:
Missing code or state from Google.(orMissing code or state.for Microsoft): you cancelled or declined on the sign-in page. Click Connect Google account again and approve.OAuth state expired or invalid. Start again from Links → Email: use Connect Google account on the source's card.(orOAuth state expired. …for Microsoft): more than 10 minutes passed, or you reused an old tab. Go back to Links → Email and click Connect Google / Connect Microsoft on the card (or Connect Google account / Connect Microsoft account in its edit form) again.Source no longer exists.: the source was deleted while you were signing in. Add it again.Google didn't return a refresh token…: remove Shippified's access in your Google account's security settings, then connect again.Microsoft didn't return a refresh token…orMicrosoft token exchange failed…: reset the app's consent in your Microsoft account, then connect again.
"Your browser blocked the sign-in window. Allow pop-ups for this site and try again."
The sign-in opens in a new tab, and your browser blocked it. Allow pop-ups for Shippified (look for a blocked pop-up notice in the address bar) and click the connect button again.
The card says "Not connected yet"
The Google or Microsoft source was saved but never signed in (its status is needs auth), so it can't sync or be rebuilt. Click Connect Google or Connect Microsoft on the card and approve access.
It's connected, but nothing shows up
Read the sync line.
Last sync failed:gives the reason. A wrong IMAP host or port doesn't change the status to auth failed, but it shows up here. Check the values against your provider's help pages, save, and click Sync now.Check where the mail is. IMAP and Microsoft read only the Inbox. Mail moved into other folders isn't seen.
Check the retailer. Only Target, Walmart, Amazon and Best Buy are built in. Other stores need a custom template.
Check the date. The first check reads only recent mail. Run a rebuild to go further back.
Check the Inbox page. If the email is listed as Rejected, the reason is shown. If it isn't listed, Shippified didn't see it as order mail. See Email activity (Inbox).
Check your plan limit. Once the monthly order limit is reached, new orders aren't created, though updates to existing orders still go through. See Plans and billing.
An email was rejected because of its sender
The source has Allowed senders set and the email's sender isn't on it. The Inbox entry says Sender … is not in this source's allowed senders. Add the retailer's domain (for example target.com) to Allowed senders, or clear the list to accept any sender. Then import the email by hand, or run a rebuild, to bring it in.
Forwarded mail bounces back to me
Read the bounce: it starts with Shippified: and gives the reason. Usually the source was deleted (so its address no longer exists), your plan's monthly limit was reached, or the message was too large.
The card says "paused"
Someone paused the source with Pause syncing. Click the play icon (Resume syncing) on the card. See Pause a source.
Gmail never showed a confirmation code
Check that you pasted the exact inbound address from the card, then reload Links → Email: the code appears within seconds of Gmail sending it. If you deleted and re-created the source, the address changed, so add the new one in Gmail.
Import says the sender isn't allowed
Sender … is not in this source's allowed senders.: the email's sender isn't on the list of the source under Test against. Add it, or choose another source.This source has allowed senders set — include the From header, or pass `from`.: what you pasted has no sender. Fill in From (sender).
Import says "Free plan limit reached"
Free plan limit reached — you've already added N of M orders this month. Upgrade to keep importing. This only appears if paid plans are switched on (they're off on shippified.net today): you've hit the Free plan's monthly order limit. See Plans and billing.